Showing posts with label Project 9. Show all posts

Tuesday, 17 December 2013

Assignment 4 - Project 9, Stage 4: Developing Design Ideas Into Weaving

There's a choice of approaches for this stage.  Either linking to the Analysing Colour, Texture and Proportion exercise and transforming piece of source material into tapestry, or working intuitively to describe a word in weaving.  As I felt my first sample was intuitive, I decided on the first option here.  Also the image I wanted to use was the same as I'd used in Feltmaking Experiments and one I'm considering developing for my final project.  I thought that the more I study this image and capture it in varying techniques, the more closely I'll be observing and understanding it before my final piece.

I'd already done wrappings in the analysis exercise.  However once I'd done the graph paper stripes and considered the proportions, I wasn't convinced that there's be enough of some of the yarns to complete the weaving. I also wanted to have some varying thicknesses so I could blend colour in some areas and add more variety of texture.      

 
From my stash I selected alternatives for each yarn and tied them to a numbered card to use as a key.


One idea that I'm really glad I had, as it saved a lot of time looking for the right shade, was to add the yarns to clear bags which I labelled and put in a large box.
 
 
I also found that squared tracing paper was really helpful for placing over the image when planning the design as I had such a large number of colours. I thought that to interpret my design though, I wouldn't have to be too precise with shape placement.  I planned three main bands with the craggier, raised area at the bottom, a slightly smoother central section then a darker upper section.


When I was done, I warped up the loom to the width of the image, using a ruler to make sure the knots were horizontal.  


I completed a few centimetres of plain weave that will be turned back for presentation.  As I was doing this I considered whether I might have rust dyed the warp threads so that they could have deliberately been left visible in parts of the weaving or perhaps knotted and hanging underneath.  However this would have taken days or weeks I did not have.  I've also noticed how my fabrics have sometimes become brittle and holey after rusting so perhaps they would become too weak and break during weaving.  Maybe painting or dyeing them would work better?   


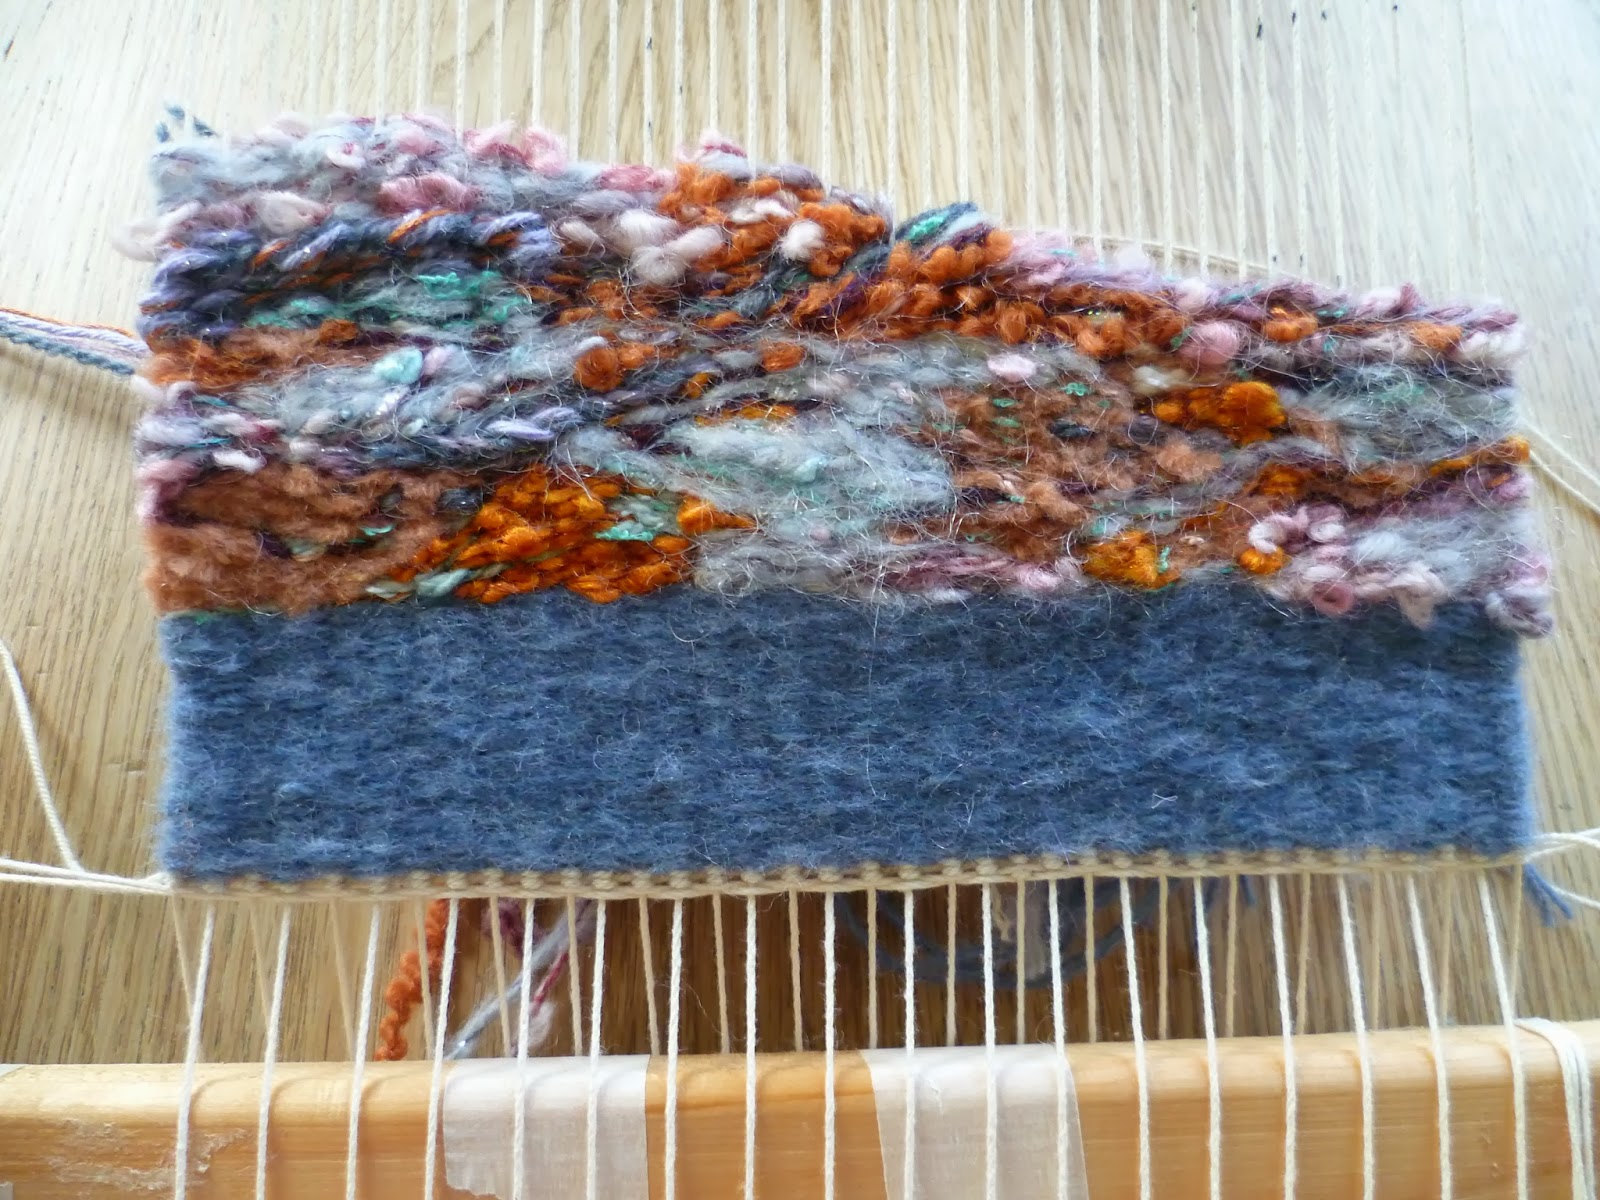
I completed the bottom section with more hairy and slubby yarns using eccentric weave and areas of Soumak, to make it appear raised.  When I began on the central section, I immediately liked the contrast of the texture, which had changed to something flatter with a slight sheen due to the inclusion of a ribbon yarn.  However after a few rows I was regretting the slight variegation in the yarn I'd chosen.  When I began to add the lilac shapes, they weren't standing out as much as I'd hoped.  The background was too distracting and light in colour.  However, I'd gone a bit far to start unpicking, I didn't think I had a suitable alternative yarn at home and the advice in the project guide is to wait until the design is completed before judging it. I did though; decide to make some adjustments to the yarn selection I had planned for immediately above the bumps, to stick with a similar texture for the whole area.  I'm pleased with this decision as I think it makes it more cohesive as a section.      


Before the top section, there's an area of dark, deep cracks where I've used dark brown and purple yarns.  I've varied between single and multiple rows of weave to make the lines look broken in some places, solid in others.  This section also has spots of white which looked right as I was weaving but once pushed down either disappeared, looked flat rather than rounded, or they seemed to end up in the wrong position.  I re-worked some of these by wrapping the warp end a few times.  I'm not sure that this would be the correct technical method to add spots but it seemed to work.  


I added more areas of Soumak to this area to create the ridges and made some gentle curves to follow.   

 
The upper area of the image is mainly blue and lilac with small touches of oranges and turquoise.  The rusting metal has a slight sparkle and here I introduced a metallic thread. I combined thinner yarns and worked with a number of butterflies on the go.  Every so often, I dropped one of the strands at the back and picked up another from a neighbouring weft hoping that this would result in the colours blending rather than standing out as spots.  
 
 
Finally, I wove a few plain rows.  Like the blue bottom border, these will be unseen once folded back and stitched as a hem. This time, I felt more confident that the whole thing wasn't going to fall apart and unravel as I cut it from the loom and trimmed the threads!


Standing back and considering the finished sample, it's not quite how I envisaged.  The three areas which look quite distinct on my image are less clear cut. The central right area that I had concerns about still irritates me and in hindsight, I wish I'd followed my instincts and dealt with it then by picking it out and replacing the variegated yarn with something self-coloured but still smooth - combining some embroidery floss with 3mm ribbon would have worked I think.
 
Though some of my yarns have been stubborn about sitting flat or curving nicely, I'm pleased I managed to select from my existing collection for Project 9, rather than spending on specialist rug wool. Something I learnt from Kaffe Fassett when compiling the Textile Artist Research Point is the infinite variety of colour that can be created by combining what you have available.  I felt weaving is similar to how he describes his tapestry, as painting with wool, though as you can only weave bottom up, it does need some planning if you are following an image.  I was happy with my source material which I could follow fairly loosely and think if I had worked a design with sharp edges that had to be precise, it might feel a bit limiting, like painting by numbers! 
 
I found the graph paper planning tedious, though once I'd started weaving; I really appreciated having the chart to refer to.  There were still decisions to make on sequences and texture, but having the colours already plotted simplified everything.  I'm sure that there's a better relationship to the original image as a result of the planning.
 
Although the central area was not captured quite as I intended, overall I am happy with the sample and its proportions. Having spent a lot of time recently observing rusty objects, for me, it does capture 'rust' in colour and texture, even though I'm using soft materials to convey something hard.  Close up, I can see and feel the change the in texture of each area and I've found I much prefer the dynamics created by eccentric weaving over plain weaving.    
  
It was interesting to weave the same image I used for wet felting and needle felting in Stage 8 and compare results.  Weaving is more predictable and cannot be rushed but it is something I'd try again.  Perhaps because it is winter and it's cosy to sit by the Christmas tree and fire, that it's easier to enjoy the quiet contemplative time and I liked getting into a rhythm on the larger sections.  Handling so many fibres has improved my understanding of their properties and I've particularly enjoyed making unusual combinations and seeing how differently a yarn can appear once beaten down and condensed.   


Wednesday, 4 December 2013

Assignment 4 - Project 9, Stages 1 - 3: Beginning to Weave

After reading through the project guide and the blogs of other students who have already completed this stage, I was concerned.  Many had reported an error in the warping up calculations that made them impossible to follow and generally there seemed a lot of confusion and wasted time.  Being someone easily befuddled at the best of times, I contacted Janet Clark, a local tapestry weaver and teacher who is passionate about passing on the skill.  She kindly agreed to sit with me as I worked through the instructions and was extremely generous with her time and materials.  She also provided some excellent, clearly illustrated notes for beginners based on the West Dean method, a list of useful resources and some helpful tips along the way.

Stage 1: Preparation - Setting up the frame and warping up.

Firstly I chose an old picture frame with dimensions closest to the instructions and a medium-weight warp yarn (12/9 cotton warp).  Janet suggested using steel corner braces for extra stability and wrapping the ends of the frame with masking tape so that the guide marks for the warps are easier to see and the tape can be pulled off if you make a mistake or want a different warp spacing next time. Another simple tip was to put the warp thread in a box on the floor to stop it travelling round the room and to pull a bit out at a time.

As I'm left-handed and it felt natural to work in the opposite direction to the instructions, I began by making two overhand knots at the top right and wound right to left attempting to keep the tension even and tight enough so the warp stays in place but not so tight that the shed wouldn't open fully.      

 
Once the frame was warped up, it needed only a little adjustment to distribute the tension and space the warps evenly. 
 
 
Next I made a heading cord at the point weaving would start.  This provides the firm base for the weaving


Janet suggested that rather than fixing the warps in position with masking tape, twining could be used after the header cord to space them evenly, bring them together and prevent them moving. 


After manipulating the warp threads to make sure they were parallel and correctly spaced, I added a row of knotting - two half hitches. This will keep the weaving from unravelling when it's cut from the loom. (Heading cord and twining will be removed at this stage.) Finally I used a ruler to push the knots in line and make they were parallel to the bottom of the frame.

 
(I wondered how I'd shape the bottom of my weaving if I'd wanted something other than a rectangle. Janet told me that I'd put a piece of shaped stiff card as a template between the warp threads and knot down to the top of it.) 

Stage 2: Basic tapestry weaving techniques

I chose some simple rug wool to begin with.  I wanted to make sure I was using colours I was drawn to as this was going to be a time consuming business and I was going to be spending a long time looking at them.  I chose this seascape inspired collection.


I practised making up some butterflies.  Janet suggested making up a few of these to begin with as you don't have to stop weaving when you're on a roll.  I also found it made weaving more portable.  Later in the week, I sat outside my girls' Tae Kwondo class weaving in the car and then did poolside weaving during their swimming lesson. It was a lot easier pulling out a ready made butterfly than having reels of yarn rolling into the pool!   

 
I read that to stop the piece from bulging out or pulling in, and to keep it flat, the yarn thickness should be the same as the distance between the warps.  Therefore it was necessary to combine a few strands.  Depending on the yarns, usually this was six. Another great tip was to cut a few inches off the end of my butterfly and tie it onto the heading cord close to the frame to keep it as a thickness guide to refer back to. 
 
 
To get to grips with the technical process, the course guide suggests completing 5cm of plain weaving in one colour.  However, I was not sure I had enough of any one yarn for this so I went straight into experimenting with different colour relationships in plain weave.  I wanted to try to create a graduated tonal field of blues like the ocean by adding and taking away one or two shades from each consecutive bundle, while keeping one contrasting orange link thread to give a lively speckle.
 
The yarn was knotted to begin with and tucked under so that it's well pushed down and hidden.  I found it easiest to open the shed with my fingers rather than use a stick and weave over and under about eight warps at a time.  Janet advised making a bubble shape with the yarn which is beaten down from the middle with a fork to prevent pulling too tightly and distorting the weaving.
 

Keeping the edges of the weaving parallel is tricky as it's so tempting to pull too tightly as the corners are turned.


I took this photo below to refer back to as I kept forgetting how the knot at the start of each bundle is trapped and hidden, as this wasn't included in any of the notes.  I made sure that I always finished part way through a row so that the loose ends that will be knotted together later were not dangling at the edge where they might be seen.


Weaving is progressing and I've found a comfortable position with the top of the frame clamped in a floor stand and the bottom resting on an arm of the sofa.


Weaving is a slow process.  When I'd beaten down the section I'd just woven, all the work I'd just done seemed to disappear.  By the time I'd completed the 5cm, I was pleased that I'd achieved the colour effect I was looking for, but definitely ready to try the next step: curved wefts and knots.  

 
I used a pen to draw on the warp threads an outline of the curved shape I wanted to build up. Though it's less noticeable in a single colour, the change in weft direction introduces movement. 


I tried Ghiordes knots using a single thicker yarn.


Next I tried Ghiordes knots made continuously using a pen as a guide rod.  It has been left uncut to give a looped pile.


Above the dark blue Ghiordes knots you can see a row of Soumak sandwiched between the two necessary rows of plain weave. I liked this ridged effect and tried this again using paper yarn, which I found difficult to work with as it wasn't pliable enough to bend.


Stage 3: Experimenting with different materials
 
At this stage we are asked to warp up the frame again to explore different effects. However, because of the suggested dimensions of the frame, there was still about 3/4 of the warp left unused.  Having read Stage 3 instructions, there was plenty of room to complete what was needed so it seemed unnecessary and wasteful to re-warp. I polled more experienced students and the vast majority had continued on the same warp for this stage for the same reasons and it had not caused any issues at assessment.
 
I began with trying out some textured knitting yarns; some smooth, some bobbled, some fluffy or hairy.  I was noticing how they behaved differently and how different proportions might be needed.  Some like this chunky Sirdar 'Snowdrops' acrylic and polyester blend below sat down nicely after beating and an interesting matt pebble-like texture was clearly visible after only a row or two.
 
 
In contrast, the Sirdar 'Organza' gold ribbon tape (80% polyamide, 20% cotton) refused to be tamed, springing up at every opportunity.  However, after a few rows I saw something interesting emerging. The slight sheen on the surface and regular bands of open-weave white resulted in a smooth, flecked surface with movement and a soft glow that I found quite beautiful.  


After enjoying this effect for a few more centimetres, I went on to combine the ribbon yarn with a strand of glitter thread in a contrasting colour. Then I tried dyed lace, which looked uninspiring in plain weave but far more interesting and frothy in continuous Ghiordes knots.  I tried unusual combinations, like used strips of polythene bag combined with various threads such as this mohair.


Different brands of bag gave more possibilities.  The bag above was thin and compliant and felt like a smooth yarn, whereas some were crunchy and creased rather than curved.  This made it difficult to weave easily and they tended to distort the warp which became visible in these areas. (In future, if I intended this effect, then painting dye onto the warp threads might be a consideration.)


Although this was just a sample, there were some areas where I tried things that just didn't work.  This orange carrier bag fitted my colour theme nicely when it was cut in strips, but when used in packed down plain weave, all its translucent subtleties were abandoned. The colour jarred - it was just too intense and vibrant, so I unpicked it.


I also abandoned this attempt at continuous Ghiordes knot with this wire which was so difficult to manipulate and distorted the warp.  As I continued up the frame, I was finding that distortions created earlier on by awkward yarns were tending to right themselves after using better behaved yarns on top but in this case, it was pulling so much, the warp threads began to cross and I couldn't tell which the odd and even layer was.  


For the remainder of the warp we are asked to choose an effect from the first section that we feel is most exciting to explore further and create a sample area.  I decided that I liked the movement of curved and irregular weaves and used a variety of yarns to build up and practise shapes. I added some outlines to define some of the shapes and some areas of curved Soumak.


Finally we are asked to complete a few rows of plain weave, cut the warp from the frame and knot the ends.  I used the same yarn I'd been weaving with to make two half hitches on each warp.  (I calculated that a length just over 4 widths of the weaving plus a little extra would be enough but - note for future - it's not!). Cutting a weaving from the frame for the first time was quite nerve-wracking as I felt sure it would unravel, but now that it's off it seems quite secure.

Before assessment I'll trim the ends at the back and consider how to mount it.  I don't like the look of the plain weaving on the top of my sample area so will probably fold some or all of this back when I come to display it on my assessment boards.  


I've found that although weaving is time consuming, it can be a contemplative time.  I've had time to consider my next weaving and final assignment and make notes, and whilst I've been working on this piece I've watched some of the 'Imagine' series on BBC .  The Outsider Art episode, that discusses the process of making being a need, also the story of illustrator Judith Kerr, I've found particularly fascinating and inspiring.  When asked about her father Alfred, who as a German Jewish essayist and theatre critic had to flee the Nazis at the start of the war, Judith talks of him having 'a great talent for happiness', despite his hardships.  She attributes his and her own happiness to obsessive observation and this quote has stayed with me:

'He was looking at things all the time and if you do that, you don't despair. He would think "yes, this is bad but it's interesting".' 
 
Bibliography
Glasbrook, Kirsten (2002) Tapestry weaving. Tunbridge Wells: Search Press