Showing posts with label Nets Knots and Braids. Show all posts

Monday, 21 October 2013

Assignment 4 - Project 8, Stage 2: Experimenting with Structures, Exercise 2

For Exercise 2, we are to make a collection of hand twisted ropes or three/four stranded plaits or braids.   Then we choose materials to interpret some surface qualities and further explore combinations to develop interesting structures, colours or textures.
 
Previously I've hand spun rope from raffia in Sue Hiley-Harris's string bag workshop and attended a braiding workshop with Ruth Gilbert where we tried some knots and techniques including kumihimo, finger knitting and using a lucet. However these workshops were more about understanding techniques rather than being experimental or making any interpretations. 
 
During Stage 1 - Exploring the Qualities of Yarn at the start of Project 8, I wound a selection of interesting yarns onto card and put them in a small plastic tub with a copy of the braid instructions as I knew this exercise would be portable enough to take on holiday with me.  I'd cut the yarns into metre lengths so I wouldn't need scissors and spent the plane journey with a safety pin attached to the knee of my jeans so I could get enough tension for braiding, whilst trying not to elbow my fellow passengers.
 
So that I could compare the structures, with each yarn I made a length of four-strand chevron braid, then a four-strand round braid and finally a four-strand flat braid. This variegated rayon wrapped gimp yarn that I chose to interpret 'smooth' shows the differences most clearly.  (I used two lengths for each strand as the yarns were quite fine.)
 
Four-strand chevron braid.  I found this braid was slightly fatter on one side and had a tendency to twist.
 
Four-strand round braid.  I found this more awkward and took more concentration to get right than the other two.
Four strand flat braid.  (The structure of this was lost on the fluffier yarns.)
 
I could imagine that by using two, three or four different colours within the braid and changing the starting positions, you could create interesting patterns along the length. Below I was interpreting 'soft'.  Chevron stripes were created by using two strands each of blue and beige and starting with two of the same colour in the outside position.
 

This round braid and chevron braid were made from fabric strips.  I padded the green and red strips to give a chunkier effect by stitching them into a tube, turning them inside out and threading through a length of yarn. You can see a pattern emerging by using one red strip to three green.


I found that braiding was a good exercise in understanding the qualities of materials as they handled quite differently.  Some were scratchy or awkward and constantly trying to escape and I felt like I needed extra hands, while others like this wool yarn felt wonderful between my fingers and behaved beautifully.    


Space dyed silk yarn.  I lined the colours up at the start and blocks of repeating colour were retained along the length
Variegated rayon yarn.  This time the colour arrangement was random. 
Combining yarns with contrasting textures 
Representing soft or smooth in braiding is relatively easy compared to other surface qualities like 'hard' or 'rough', particularly when you are limited to materials that you can carry on a plane.
 
Representing 'soft'.


I tried some paper string which felt quite rough to begin with but by braiding, it felt like I was taming it.  If I'd tied small pieces of paper or wire down the lengths so they'd stuck out, I think the effect would be much better, along with using a colour less passive than lilac. 


I tore some builder's scrim into strips but again by braiding, some of the roughness was tempered as the scratchy raw edges curled inwards.

 
These next two I felt were more successful attempts at interpreting 'hard' using deconstructed jewellery.
 
Four-stranded chevron braid to interpret 'Hard and shiny'
'Hard' - I liked how the bugle beads forced the sharp angles
 
Below I combined two stands of a soft yarn with three beaded strands to interpret 'bumpy'.

 
This was my final attempt at 'bumpy'.  Adding larger beads to one of the four strands made this structure so much more interesting.


While I was away I had the luxury of having a little time to myself so it was a great opportunity to try some observational drawing as my tutor has suggested.  In Slovenia it was easy to find a quiet outdoor spot where I could draw uninterrupted without worrying who was looking over my shoulder.  I feel very out of practise but at least I've made a start.


Tuesday, 18 October 2011

Workshop - String & String Bags with Sue Hiley Harris

After enjoying my visit to Sue's exhibition a few weeks ago, I decided to take part in this workshop at Bankfield Museum last weekend.  I thought it might help me later on in this course, with particular relevance to part four on textile structures.  It was also an opportunity to meet other people interested in textiles who appreciate there's bound to be a good reason you're drying out your tea bags or collecting bits of sheep fleece when out for a walk etc.  I always seem to come home from a workshop with some new tips and information about what's on.   

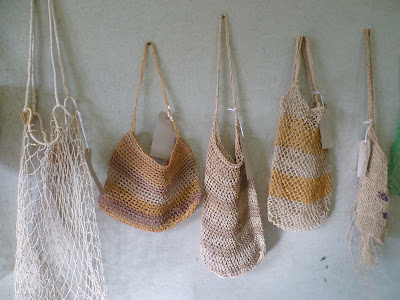
We began on Saturday by handling Sue's collection of Aboriginal string bags and looking at their construction, noticing the differences between looped (like the one that sparked the idea for the exhibition) and knotted.  We saw the differences between fixed and suspended knots and between simple looping, loop and twist, and figure of eight loops.  Sue said that the older bags in her collection from the 1970s were bought quite cheaply but there is now an increased appreciation of the skill and the bags are more sought after and expensive. 

All of the bags were subtly different, the form dictated by the fibre and purpose - whether for the Aborigines own use to carry particular items, or to sell on to tourists.  The bags are more rigid than the crocheted string bags that have once again become popular as environmentally friendly alternatives to plastic. Some were constructed from top to bottom and some from bottom up which sparked a discussion about weak points, where and how to join string and attach handles as it's not possible to work with long lengths on your needle.  The traditional bags were made from hand spun plant fibres and the Aborigines would just attach more length as needed, generally without the need for knots.  However, some bags did have knots and long threads were left hanging.  Most of us found this strange and a bit disturbing, particularly as they were on the outside of the bag.

Some of Sue's collection, note the bag on the right with hanging threads

At the talk the other week, Sue had explained that there are hundreds of different tribes and languages and a great deal of secrecy among the Aborigines so it is very difficult to get accurate information about their lifestyles and craft.  We do know that they tensioned the bag structures using their legs as a frame and as there were no chemical dyes available to them, the only colour seen on some of these bags is yellow ochre. No containers for holding dye were available either so it's likely they coloured the string using their hands covered in earth.      

After a look around the exhibition, we got set up ready to have a go at a looped technique first.  First we choose some string.  I had brought some ordinary parcel string but after looking at the bags decided to buy some hemp twine as it seemed to hold knots better.  We used G-clamps to attach warp posts to the table about 1.2m apart and tensioned a thick piece of string between them, making loops at each end that would allow the work to be removed and rotated at the end of each row.  Unfortuntely, although we were essentially working a blanket stitch, the first few rows are the trickiest and I cursed my left-handedness, struggling to reverse the diagrams from the handouts in my head.  Waiting for help at the end of each row as I couldn't fathom the corners got pretty frustrating.  My first attempt had very uneven tension and was pretty odd-looking with funny knots in random places.

Attempt 1.  It toook about 2 hours just to do this! 

As starting was the difficult bit, Sue suggested we practised this again on a new sample.  Attempt two was going better and I took it home with me to work on.  This time I tried a tighter tension to see what a denser fabric would look like.  Back at home I scannned, reversed and coloured the handouts and understood them immediately!  I worked a few more rows, feeling pretty pleased I finally twigged what I was supposed to be doing.  Then disaster!  I hadn't pulled a knot tight enough and when I trimmed it, it began to unravel.  Determined not to be defeated, I strung up attempt three and by the early hours of Sunday morning I had a more or less, bag shaped thing, even with knots (pullled very tightly!) lined up as intended.


Getting the hang of it now

Back at Bankfield after a too-short sleep, I had a go at hand spinning with raffia.  Sue showed us how the Aborigine's would do it but as it was a cold day, none of us had bare legs exposed and it didn't work too well.  Then another lady on the course who was a basket weaver showed us a technique she used with day lillies to get exactly the result we were after using just our fingers.  Two strands of raffia were dampened very slightly with a water spray to make them easier to work with (too much and it becomes sticky).  A knot was held in one hand.  In the other, the back strand was twisted tightly away, then moved over the front with the index finger pushing tight in the space between the two.  I found it quite enjoyable - something you could do without concentrating while you were watching T.V. I reckon it would take months to make enough for a bag though.

Hand spinning with raffia

Next we got set up ready to have a go at the knotted bag technique.  The netting needle is wound with string so there are not so many joins to make and a lot less string is used overall.  I was surprised how far my hemp was going, so apart from the time it takes to make these bags, material-wise, it's a very economical way to make really strong structures.  

I managed the knotting itself ok.  This is essentially the same technique as making fishing net but my tension was all over the place as I struggled to get the netting needle easily through the loops.  I think that the ruler I was using for a mesh stick was a bit too narrow.  My holes were pretty irregular and the knots moved more than they should.  Again when making a bag, starting off was the most difficult bit as the size of the loops needed to be different to create the base and curved shape.  Some loops had three knots and others four.  We used thread to mark the ends of the base to help us identify them but again I found the right-handed diagram on the new handout very diffucult to follow in reverse. 

Knotting, using a netting needle and ruler as a mesh stick for spacing

We were showed some different ways to finish our bags and we talked about which bags we thought had been finished most sympathetically to their shape.  Some bags had one simple drawstring thread through the top loops as a handle while others were one thicker piece of spun string or a number of strings and some had wrapped areas.  Finally those who had finished hung up their bags and we admired our creations before taking them home to show to a quite unimpressed family! 


Finished sample bag, just right for carrying my apple!

That night, I went on the internet to research left-handedness as something that should have been obvious had also occurred to me that day.  That is why I've been preferring to draw on sheets of paper rather than in a sketch book - the spirally bit gets in the way of my hand! The metal rings in my binder when I'm making notes annoy me too, however it doesn't feel quite right starting from the back of the book.  I looked up some products and decided to order a left handed book of stitches before I start the next project to see if it makes life easier.     

Saturday, 13 August 2011

Bargains and Braids

Mum heard there were bargains to be had and joined me on the trip to Texere.  When we arrived at 9.30am, they were queueing outside the door and down the street!  The Weaving with Sticks workshop was due to start 10am so I was hoping to get in and have a good rummage before it started.  When they opened the doors a few minutes later it was hard to see anything for bodies but I did manage to pick up a few cones of the free yarn before it all went.  Exactly what it is I'm not sure as there's no labels but possibly good for weaving.  There was a lot of balls/skeins for £1 so I bagged 10 of them including what I think is some pure wool for dyeing. 

10am came and went and there were apologies as Texere couldn't get hold of the tutor who hadn't arrived but I was quite happy as I could go for another look around the sale as it got quieter.  There was also some people who had come to a beginners knitting group so Mum and I helped out with their cast-ons.  I also got to speak to one of the work experience students at Texere (I had popped in and met the other one the day before).  Both were really positive.  They showed me the list that the Texere team give them of things they'd like doing such as working out how to set up and use an old knitting machine, using the looms or coming up with simple patters for some of their own yarn.  They said they thought it would be an ideal opportunity for me to interact with another textile student as I am studying at home and the flexibility to work the hours I'd like would fit in well with the family.  Also there's so many materials at hand to use.  I'm hoping to be able to do some experience there next year from summer onwards when they have a vacancy. 

Than came the news that the workshop was cancelled as the tutor's car had broken down.  I was only slightly disappointed as I got to go round the sale yet again.  Two large bin bags later and I had spent the amount refunded from the workshop!  It's an interesting collection including quite a lot of funny coloured mohair. There's always Ebay! I bought a back issue of a magazine with some free needles attached for 20p and sat down to have a play with my new stash before the afternoon workshop.  I made a cover for my mobile phone that was so ugly I'm not showing it to anyone and learnt that chenille does not stretch and if you're combining it with another yarn, cotton is good as it doesn't stretch either.

'Simple Braids' was the afternoon workshop with Ruth Gilbert.  She told us a bit about the Braid Society and explained it is generally an inexpensive craft needing minimal equipment.  Often it's just yarn needed along with something to give tension such as a chair back or table clamp. Ruth suggested if we enjoyed braiding, we try to get hold of a copy of the Ashley Book of Knots. First published in 1944, with it's 7000 illustrations, it's still current and could keep your fingers occupied for life. Next it was pretty much, 'There's some yarn and instructions, have a go.'  Things went a bit quiet as we got started. Look at the concentration on the students faces on these photos!


One of the Texere work experience students was fasting so had to concentrate extra hard!

Table clamps are really useful to create tension for braiding

Ruth demonstrates finger knitting

I tried plaiting with different number of strands, finger knitting flat and tubular, using a lucet and simple braids including 'Idiot's Delight', made just with the fingers using two strands and one loop.  Another supposedly simple braid turned out quite differently from the illustration.  Ruth was really interested and wanted to work out how I'd done it as it was a construction she said she had never seen before.  Unfortunately by then my mind was befuddled and I couldn't recreate what I'd 'invented'!

Making the first loops to start finger knitting

Idiot's Delight. No. 2896 in Ashley Books of Knots!

A Lucet

Next I tried kumihimo braiding using an octagon cut from cardboard with notches snipped into the centre of each side and a hole in the middle. I found it quite funny looking on the Internet later seeing kits for sale.  They were up to £10 just for a cardboard octagon and a set of instructions without even any yarn. Well, save some money, here's how it's done: Seven strands of yarn were cut to the same length, poked through the central hole and knotted together just underneath.  They were each threaded through a notch so one was left free.  Yarn was passed over two other threads into the gap and this was repeated, always in the same direction.  Eventually the braid emerges and begins to grow.  I used my thumb and forefinger of the opposite hand to keep an even tension underneath.  After the workshop, I took it home with me and it took about two hours that evening just to create a braid about 60cm long.  I'm not sure I have the inclination to try out more thread combinations and concluded that this would be an ideal activity for a very long plane journey.

Kumihimo - working clockwise, the blue yarn has been passed over the brown and dark blue and into the gap.

Braid beginning to emerge underneath

Sample braids

Smooth yarns of similar weight certainly worked best for the braids I tried as they are so time-consuming it seems a waste not to show off the the construction.  Definition was lost with anything hairy.   Back at home I rummaged in the drawers to find a Scoubidou kit one of the girls had been given and helped them all make a tag for their identical suitcases. That kept them quiet for a bit and they were very proud of their creations.  We're off to Jersey now for a week.  I've contacted the Harbour Galley in St. Aubin and someone has kindly offered to meet me to show me round.  I'll take pencils and a sketchbook too and hopefully will get an opportunity to stop and draw.


We know whose suitcase is whose!