The research point, and the Imagine arts series I've been watching whilst weaving, also led me to think about my own work and make further investigations. Kaffe Fassett and Judith Kerr for example, really stressed the importance of being an almost obsessive observer and I enjoyed reading how, though now in his 70s, Fassett is still inspired by his visual memories, even going as far back as his childhood. Increasingly, I find I'm linking back to something I've seen or done earlier in the course that might not have seemed relevant or useful at the time, such as the Nike Savvas 'Liberty and Anarchy' Exhibition I related to the structures exercise.
Sue Reno, a quilt artist I researched, uses cyanotypes in her work. I experimented with photograms and sun prints earlier in the course and she inspired me to find out more so I booked a cyanotype workshop. I learnt techniques on how to prepare papers, did further print experiments, identified when prints are ready ('pregnant snow cloud' is a phrase I'll always remember!) and came home with ideas on what I'd like to try in future, such as painting solutions onto silk or cotton and trying substances like bleach or tea to see if and how this alters the colour. Contacting the Museum of Film and Photography in Bradford to arrange access to their archives to see the notebooks of Anna Atkins is something I'll do next year for myself and other OCA students.


Below are some of my photographs, copied onto acetate and held flat with an inexpensive clip frame. This resulted in much crisper, detailed images than my previous sun prints.


This last print was created by placing the prepared printing paper under a quick sketch I made directly onto acetate using a black marker.

During this assignment I've really appreciated how important the properties of the materials I'm working with are to my enjoyment of the process. I've experienced frustration braiding and weaving with scratchy, inflexible yarns. The sensation of gritty rust dust on my fingers, staining my nails and working surfaces has been unpleasant along with the eye-watering acidic smells when preparing for rust printing. In contrast there's been smooth silk and soft merino yarns which feel wonderful under my fingers and the excitement and anticipation of revealing the contents of a rusty buried package that immediately makes the disagreeable parts of the preparation stage worthwhile. Opening the parcels feels like Christmas, when you almost don't want to unwrap a beautifully wrapped present as you don't know whether you'll be delighted or disappointed.
Here's the results of the experiments I began in Project 8, Stage 2, six weeks on. The left package was in the greenhouse in the same polythene packet that I've successfully used for previous rust prints. The right hand package is freshly dug up after burial.
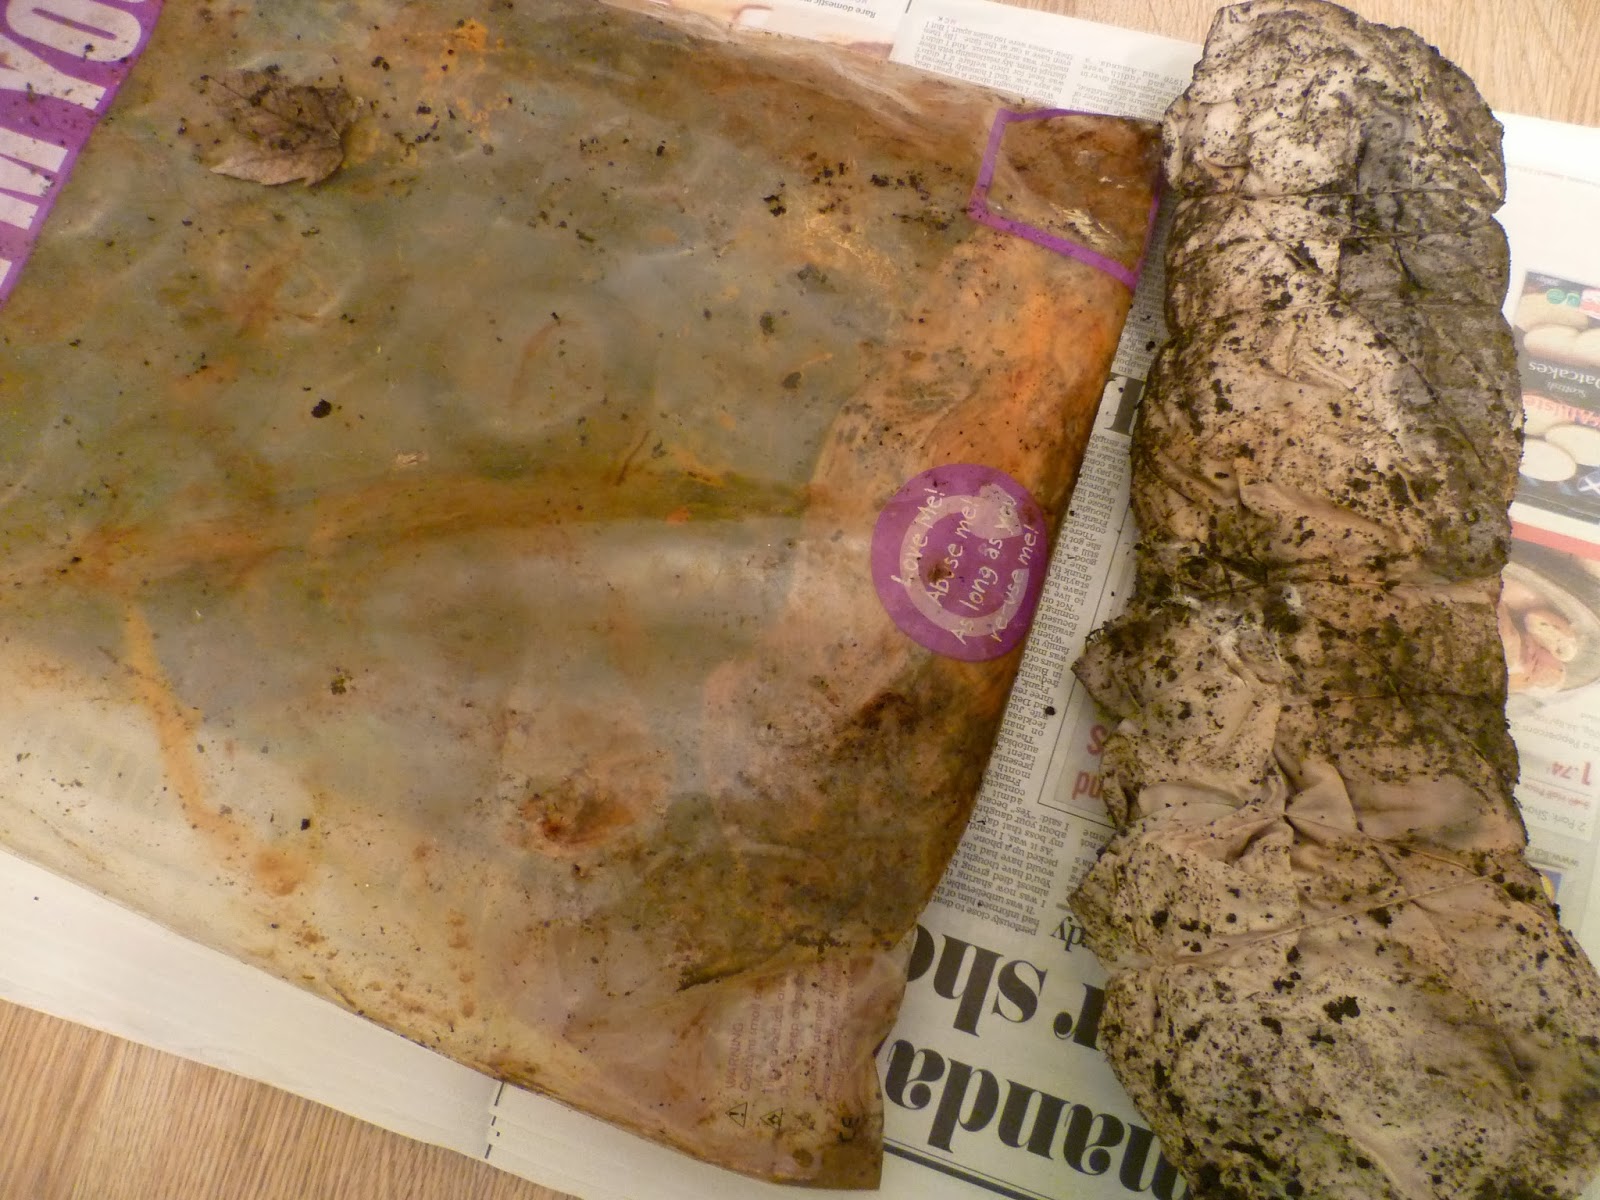
The outer layer of the buried package was the largest cloth. I've tentatively planned to incorporate this into my final piece as it has a fairly open weave so should be suitable for the nuno-felting I have in mind. Once I've found out how to do it and made some test samples that is!

I'd wrapped various yarns around each layer that I could use should I decide to incorporate stitching. Any stitching will be by hand as the rust could damage my machine.

I love the range of shades; from the subtle peach to strong rusty browns I got from soaking in white vinegar and the lilac/grey that resulted from tea.

These were the cloths underneath. I was fascinated by the grey silk square that makes me think of some winged creature like a bat or moth. I've never had a result this dark before. Was this just a co-incidence, or caused by chemicals in the soil? The cloths here were freshly dug up and soaking wet, so the shades were slightly lighter once dry. I was a little nervous washing the cloths but washing is necessary to neutralise them (and remove the smell!). Having done it before, I was reasonably confident the prints would remain and they have.

I also wanted to capture how the grid weaving had changed before I disposed of it. There's not much left. It's a very fragile and unfriendly object to handle now - brittle, grainy and sharp.


This was the greenhouse package ready for unravelling. (Just noticed piece of lace on the right is same one I used for cyanotype print above.)

When I unwrapped the fabric lace layer, something new and exciting was underneath - this sparkling turquoise square!

Initially I thought the turquoise silk I'd added had bled somehow but then realised it was the caused by that small mystery square of Metaltex I'd popped in. The square itself also had some beautiful autumnal markings on both sides but it is now very brittle and too crumbly to be useful.


The interlaced rectangle I had wrapped hadn't changed in any interesting ways itself but I love how the pattern from the nails has transferred onto the fabrics.

I thought there was a good chance the intensity of the turquoise mark would change by washing or over time so took a few more shots to record it. I'm glad I did. As the fabric dried a hole developed in one side. I've found this often happens as the rusted fabrics dry and shrink. They become more fragile, particularly the highly crusted areas where there had been close contact with the object and especially if it's a delicate fabric that's been left a long time for a strong print. I'm hoping that, by nuno felting, as well as adding texture to the patterns and colours, this will give the stability and durability a delicate open weave fabric would need to function when incorporated into a useful object.


Finally I unwrapped the other stitched grid. Again the most interesting result was the marks transferred onto the silk fabric rather than any changes to the sample.

(I visited the Silk Museum in Macclesfield with the Embroiderer's Guild a few weeks back and my purchases from the bargain bucket of silk samples have come in very useful.)

The tiny dark grey patterns made by the grid itself are my favourites. I think I should be considering some way of highlighting the most interesting areas of any prints I use.


I linked some of the other exercises in this Assignment to my theme and this has given me clearer ideas on the direction my final piece is likely to take. In Part 4, Textile Structures, as well as the exercises, I continued experimenting with felt-making and also tried paper-making. Both are additional methods of creating a surface. (I'll shortly be writing a report on the paper-making for OCASA, along with Letterpress and Bookbinding. These were a series of three workshops I arranged for OCA visual arts students following a successful application to access the funding pot for student-led activities. Links to follow soon.)
Below are some of my handmade papers which I've letterpress printed with words found on manhole covers. Here I was making rust marks on it, trying torn up Brillo Pads and tea. I've also made some papers with snippets of rust printed threads and fabrics incorporated and have begun binding the papers into a book.

My final piece is due to my tutor on 31st January, which is not long at the rate I can manage alongside family and working life, so I'm grateful I've been progressing my theme alongside assignment 4.
No comments:
Post a Comment